Prepare

Scenario, outcomes, and setup

You are building a cloud-connected distance-monitoring node. The Arduino Mega and LabVIEW measure distance locally, publish JSON telemetry to ThingsBoard Cloud, and receive a persistent shared-attribute command that controls a local LED. This is the first full monitoring-and-control IoT loop in the course.

Cloud workflow

The ThingsBoard stage will create the cloud account and device. This stage only introduces how local sensing, telemetry, and remote control fit together.

Device model

Create one device named Lab7-Ultrasonic-StudentName. One physical project normally equals one ThingsBoard device, not one device per sensor or actuator.

Data model

Publish distance_cm and actual led_state as telemetry. Receive desired led_switch as a shared attribute.

Course software environment

Use Windows 10 or 11, Arduino Mega 2560, LabVIEW 2026 Q1, NI-VISA 2026 Q1, and the LabVIEW Hobbyist Toolkit/LINX 2026 Q1. Prefer 64-bit LabVIEW unless the installed MQTT library specifically requires another bitness.
Materials Checklist

Confirm the required materials

Gather the following software, hardware, accounts, and course resources before beginning the lab.

Credential warning: a device access token is a credential. Anyone who possesses it may be able to send data as that device. Use YOUR_DEVICE_ACCESS_TOKEN in examples; never hardcode a real token in public GitHub repositories, screenshots, reports, shared documents, HTML, or completion JSON. If a configuration file is needed, distribute only a token-free thingsboard-config.example.json, keep the real local copy excluded by .gitignore, and clear saved front-panel defaults before distributing a LabVIEW VI.

Predict

Sort the IoT data flow

Number each event in the monitoring path and then the control path. This is a quick mental model check before you wire or configure anything.

Distance path

Choose an order for every distance-path event.

Control path

Choose an order for every control-path event.

ThingsBoard data model and topic practice

Telemetry

Measurement or reported state sent by LabVIEW: distance_cm and led_state. Publish JSON to v1/devices/me/telemetry.

Shared attribute

Persistent desired state sent from ThingsBoard: led_switch. Receive live changes on v1/devices/me/attributes.

Desired versus actual

led_switch is the dashboard user's desired state; led_state is the actual state LabVIEW reports after applying local logic.

{
  "distance_cm": 42.7,
  "led_state": true
}
PromptYour answerExpected check
Publish topic for telemetryCorrect.
Subscribe topic for live shared-attribute changes
Which pin on the ultrasonic sensor sends the pulse?
Which pin on the ultrasonic sensor returns timing information?

Build

Create and Configure Your ThingsBoard Cloud Account

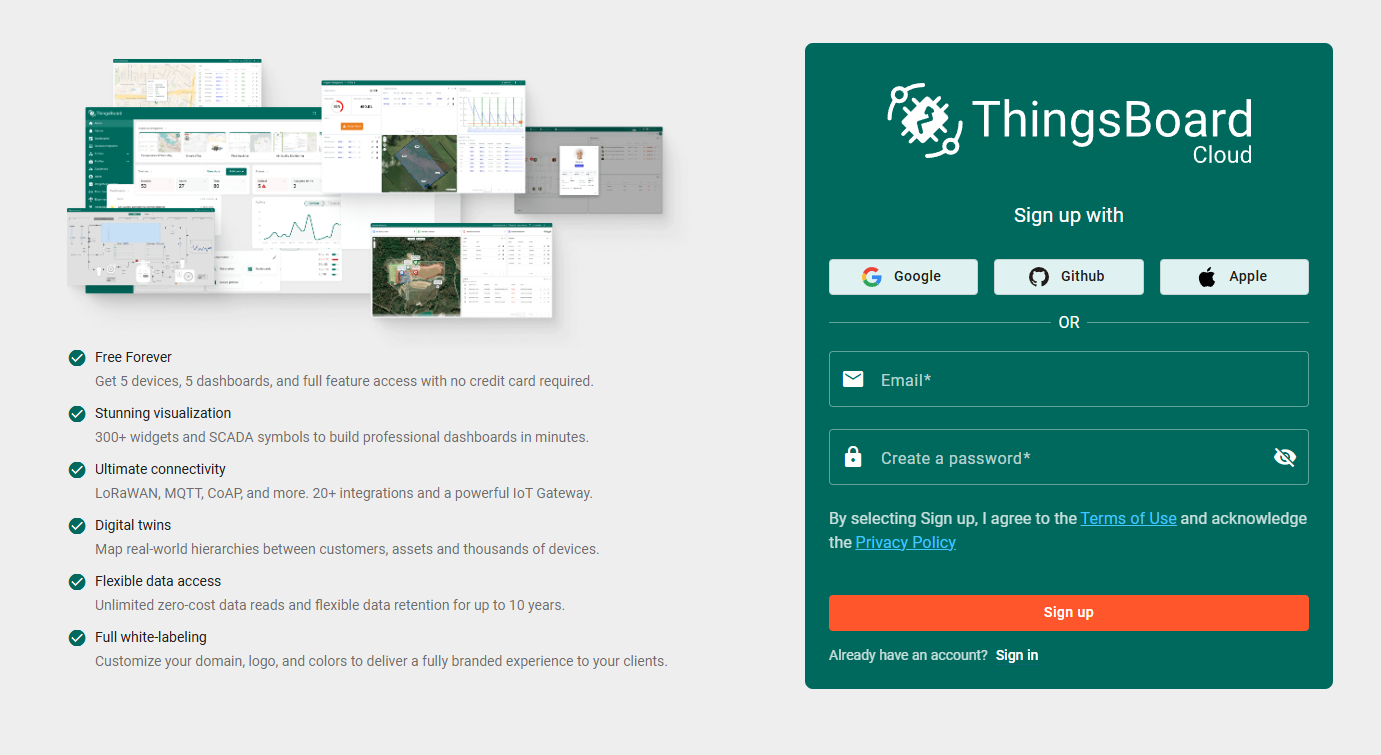
  1. Open ThingsBoard Cloud, create an individual account with your student email address, and complete email verification if requested.
  2. Sign in and confirm that you are viewing your own tenant account.
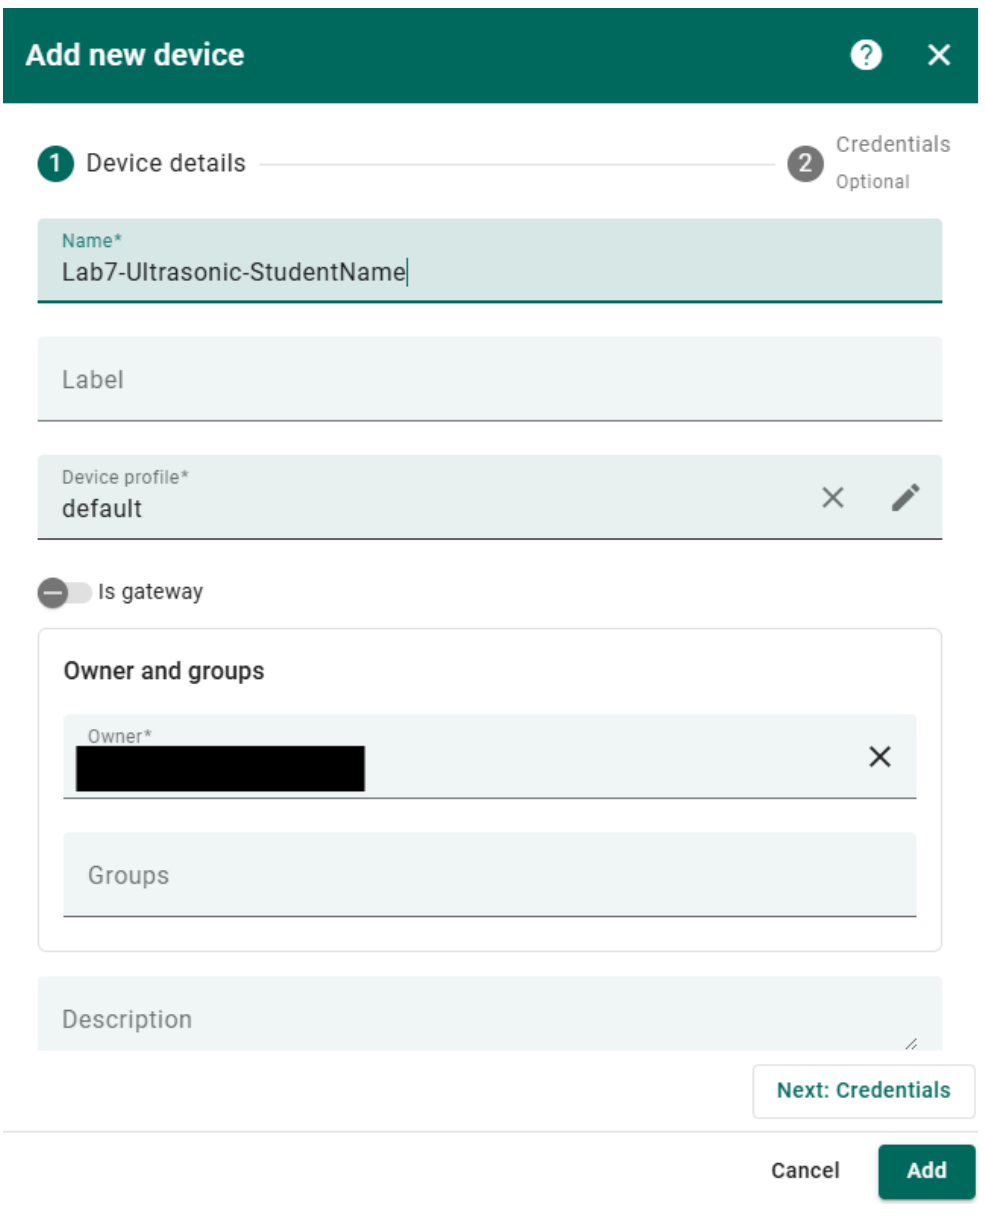
  3. Open Entities → Devices, select Add Device, and create Lab7-Ultrasonic-StudentName. Leave the device profile as the default unless your instructor provides another profile.
  4. Create only one device for this physical laboratory setup. Do not create a separate device for the ultrasonic sensor and LED.
  5. Save the device, open its details or connectivity information, locate its device access token, and copy it temporarily to a private local location.
  6. Never enter the token into a response field on this page. Use the placeholder YOUR_DEVICE_ACCESS_TOKEN in documentation.
1ThingsBoard Cloud account registration page with sign-up providers, email field, password field, and Sign up button
Create the ThingsBoard Cloud account from this registration page, then complete email verification if requested.
2ThingsBoard Add new device dialog with the Lab7-Ultrasonic-StudentName name and default device profile selected.
Enter the device name and retain the default device profile before selecting Add.

Ignore the connectivity prompt

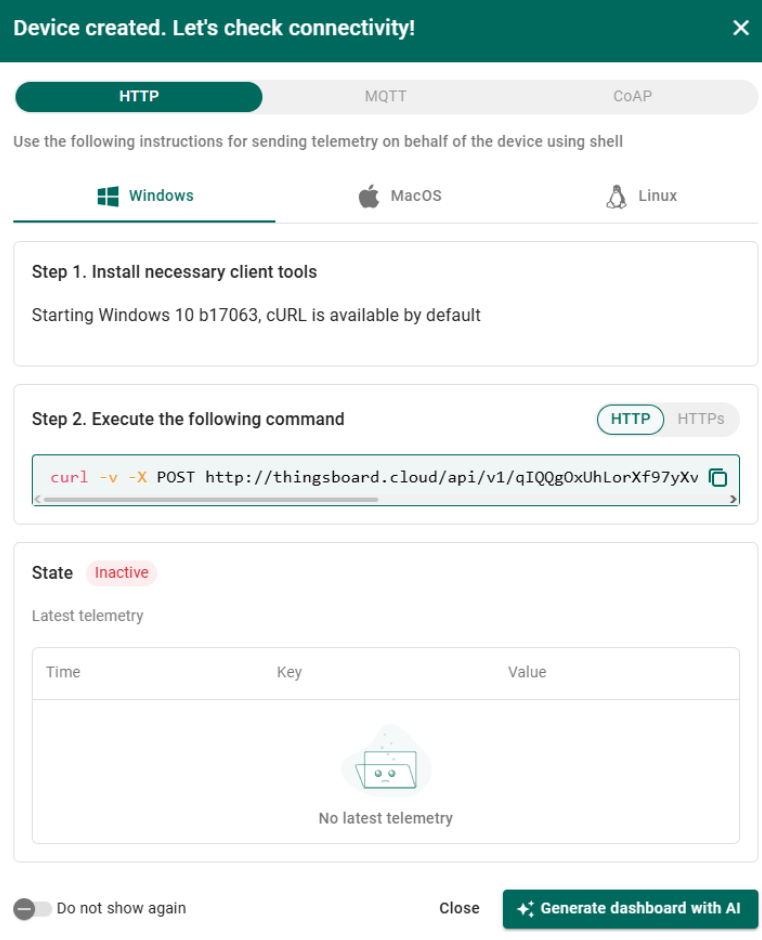
After selecting Add, ThingsBoard may display a connectivity prompt like the example below. This prompt is not part of the Lab 7 workflow. Do not run its shell command; press Close and continue to the device details page.

3ThingsBoard Device created connectivity prompt with a Close button and shell command instructions.
Ignore the HTTP/cURL instructions and select Close.
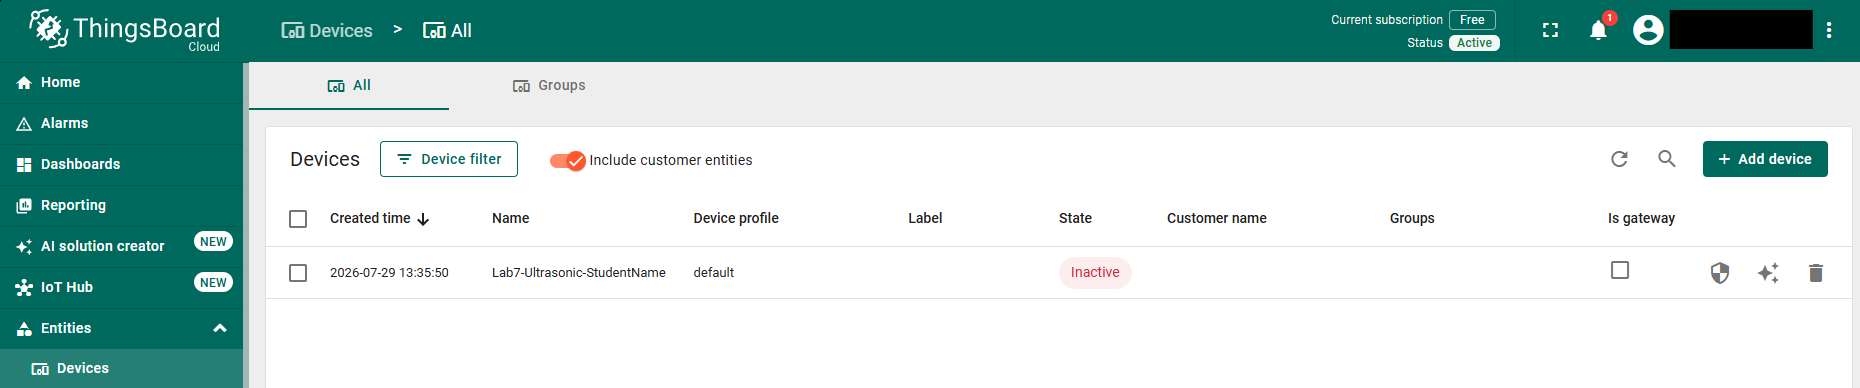
4ThingsBoard Entities Devices page showing the Lab7-Ultrasonic-StudentName device in the device list
After closing the connectivity prompt, open Entities → Devices and confirm that the Lab 7 device appears in the list.
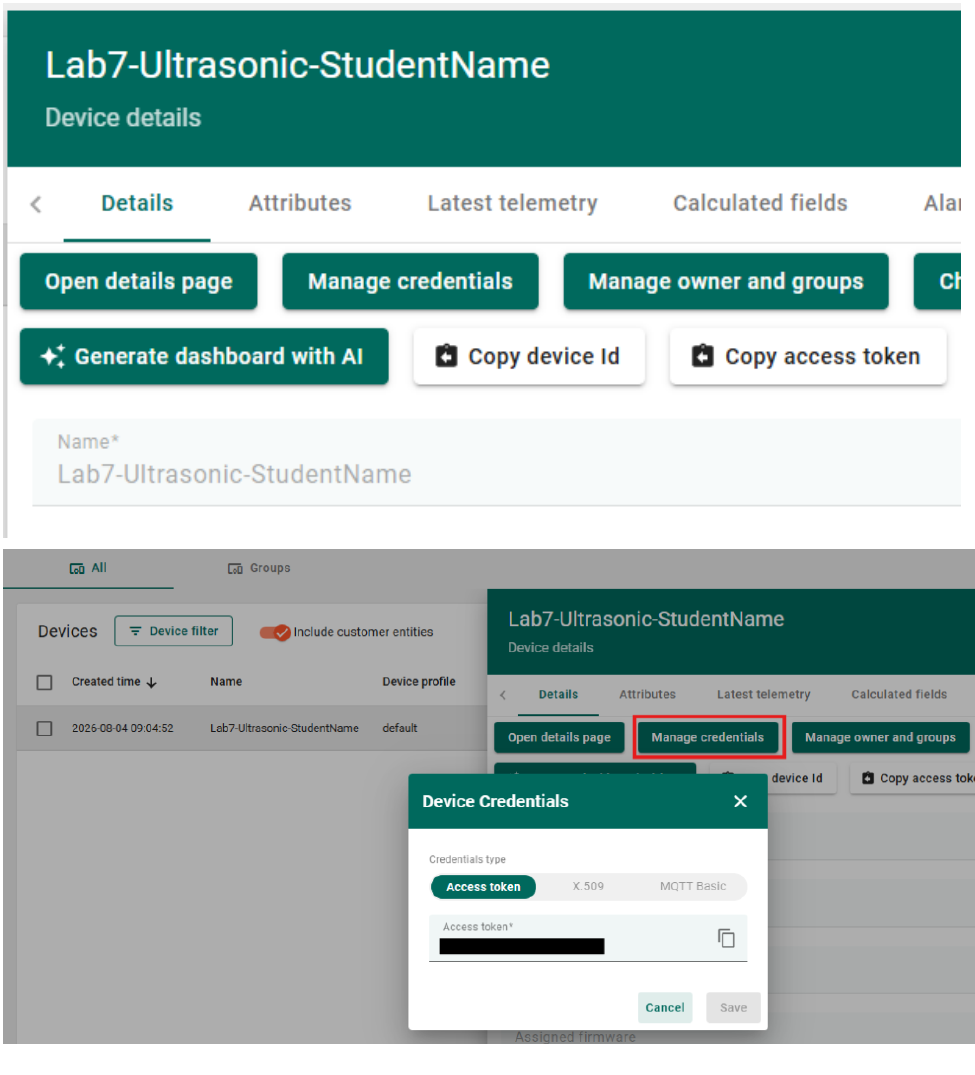
5ThingsBoard device details page showing the Manage credentials button and a device credentials dialog with the access token redacted.
Open device credentials and copy the access token privately. The example token is redacted and must never appear in submitted evidence.

Evidence capture

Think it through
  • Does ThingsBoard measure distance, or does it store telemetry sent by LabVIEW?
  • Why is one physical project represented by one device?
  • Why is led_switch a shared attribute while led_state is telemetry?

Build

Configure LabVIEW MQTT and test publish/subscribe

Download Lab7.zip from Avenue to Learn, extract it, and open Lab7_init.vi. On the MQTT tab, configure ThingsBoard authentication and topics. Use 64-bit LabVIEW 2026 Q1 unless your installed MQTT library requires otherwise.

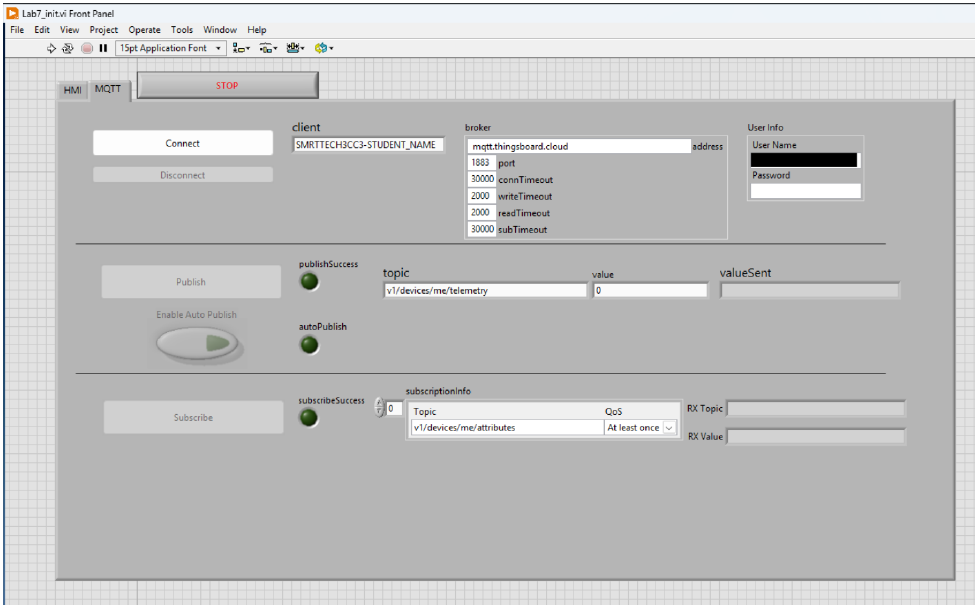
LabVIEW MQTT tab showing the broker, port 1883, unique client ID, telemetry topic, attribute subscription, QoS, and a redacted user name.
Configure the broker, port, unique client ID, QoS, and ThingsBoard topics. Keep the device-token field redacted in all screenshots.

MQTT tab settings

  • Client ID: unique to every simultaneous connection, such as SMRTTECH3CC3-STUDENTNAME-LAB7.
  • Broker: mqtt.thingsboard.cloud
  • Port: 1883
  • User Name: the ThingsBoard device access token.
  • Password: leave blank.
  • QoS: 1, at least once.
  • Publish topic: v1/devices/me/telemetry
  • Subscribe to the live shared-attribute topic v1/devices/me/attributes and configure the library's response listener for requested attributes.
Transport security: port 1883 is unencrypted and is provided for the controlled classroom setup or initial connectivity testing. If the MQTT library reliably supports TLS and certificate verification, explicitly enable TLS and use port 8883. Entering 8883 alone does not enable or verify TLS.
If the MQTT connection or first publish fails
  • Confirm mqtt.thingsboard.cloud, the intended port, a unique client ID, the device token as User Name, and a blank password.
  • Use the exact topic v1/devices/me/telemetry with no leading slash and validate the labelled JSON payload.
  • Confirm the token belongs to the same ThingsBoard device whose Latest Telemetry tab you are viewing; check whether the network blocks MQTT.

First MQTT test

  1. Run the LabVIEW program.
  2. Press Connect and confirm the MQTT connection succeeds.
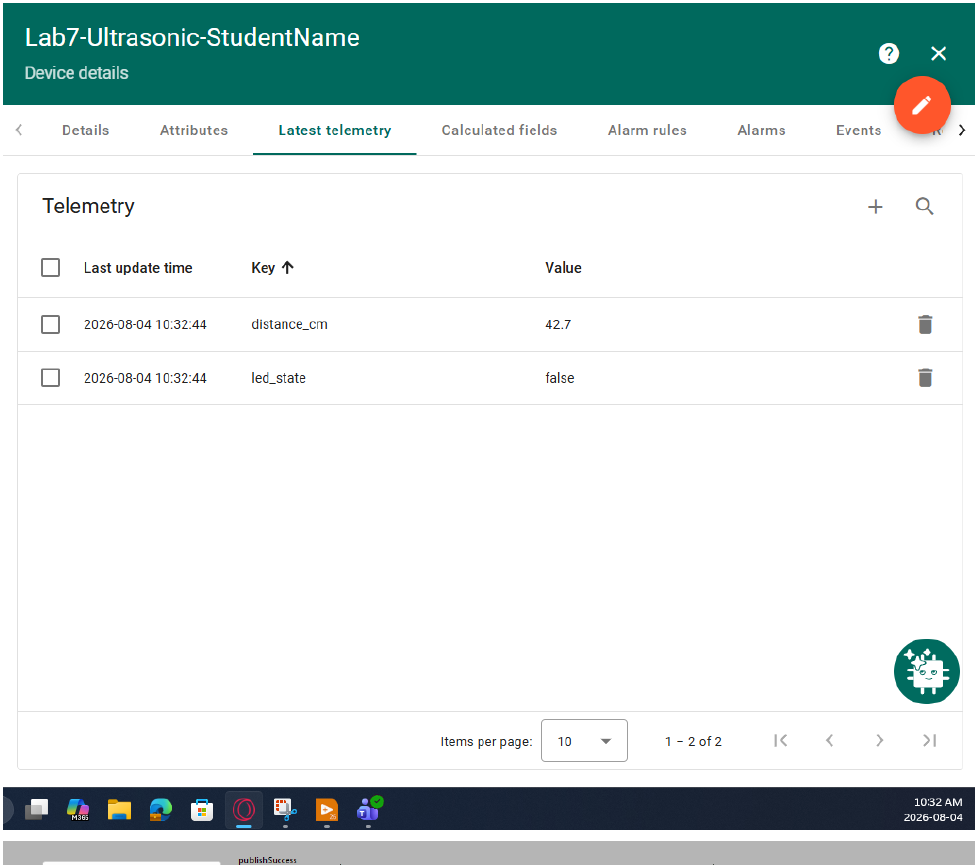
  3. Publish {"distance_cm":42.7,"led_state":false} to v1/devices/me/telemetry. Do not publish an unlabelled number such as 42.
  4. Open Entities → Devices → your Lab 7 device → Latest Telemetry and confirm both keys appear.
  5. Subscribe to v1/devices/me/attributes and configure the MQTT library's response listener for requested attributes. A subscribe-success indicator only confirms that the broker accepted the subscription.
  6. Open the device's Attributes → Shared Attributes tab, select Add attribute, name the attribute led_switch, choose a Boolean value, and save it initially as false. After the LabVIEW file is running, change the value to true and back to false to confirm that each update is received.
  7. Use Stop, not Abort, so MQTT, LINX/VISA, queues, events, and other references can close cleanly.
ThingsBoard Latest telemetry tab for Lab7-Ultrasonic-StudentName showing distance_cm and led_state values, with LabVIEW publish controls below.
Confirm that both distance_cm and led_state appear for the Lab 7 device after a publish.

Build

Create the ultrasonic sensor and LED circuit

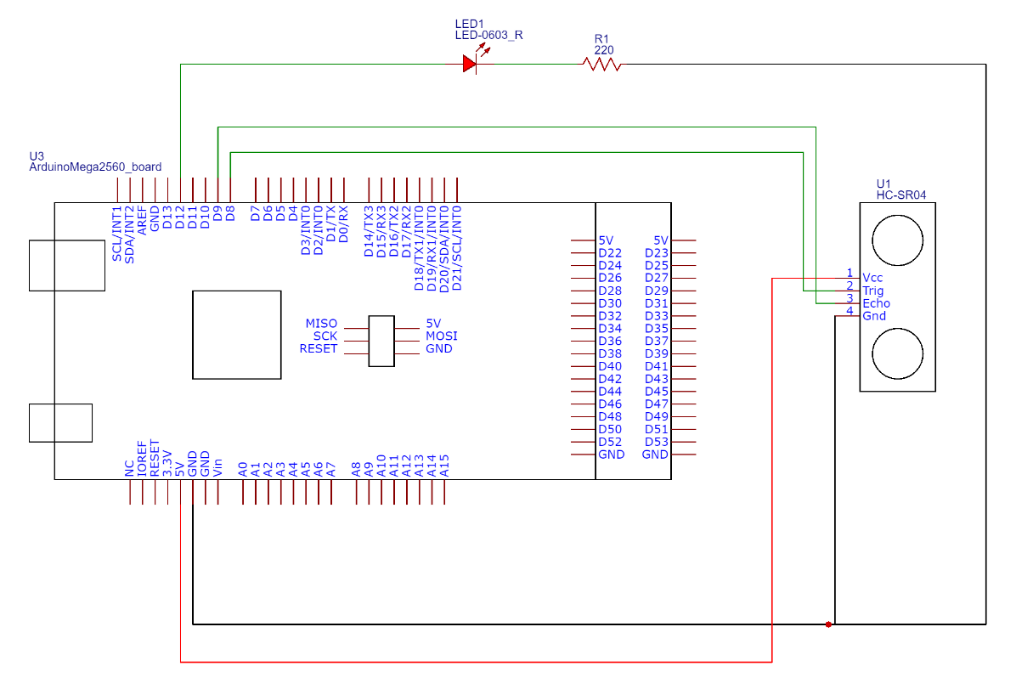
Wire the local sensing and actuation hardware. The ultrasonic sensor provides distance measurement; the LED provides a visible actuator controlled locally and from the cloud.

Schematic showing an Arduino Mega, HC-SR04 ultrasonic sensor, and LED with resistor.
Connect Echo to D9, Trig to D8, and the LED output to D12 through a 220 Ω resistor.
Think it through
  • What does the ultrasonic sensor physically measure?
  • What evidence would prove Trig and Echo are not swapped?
  • Why does the LED need a current-limiting resistor?
If local hardware behaviour is wrong: stop the VI and disconnect Arduino USB before rewiring. Then verify LED polarity and its 220 Ω series resistor, D12, HC-SR04 power and ground, Trig D8, and Echo D9 before restoring power.

Measure

Build the LabVIEW HMI and local sensor read

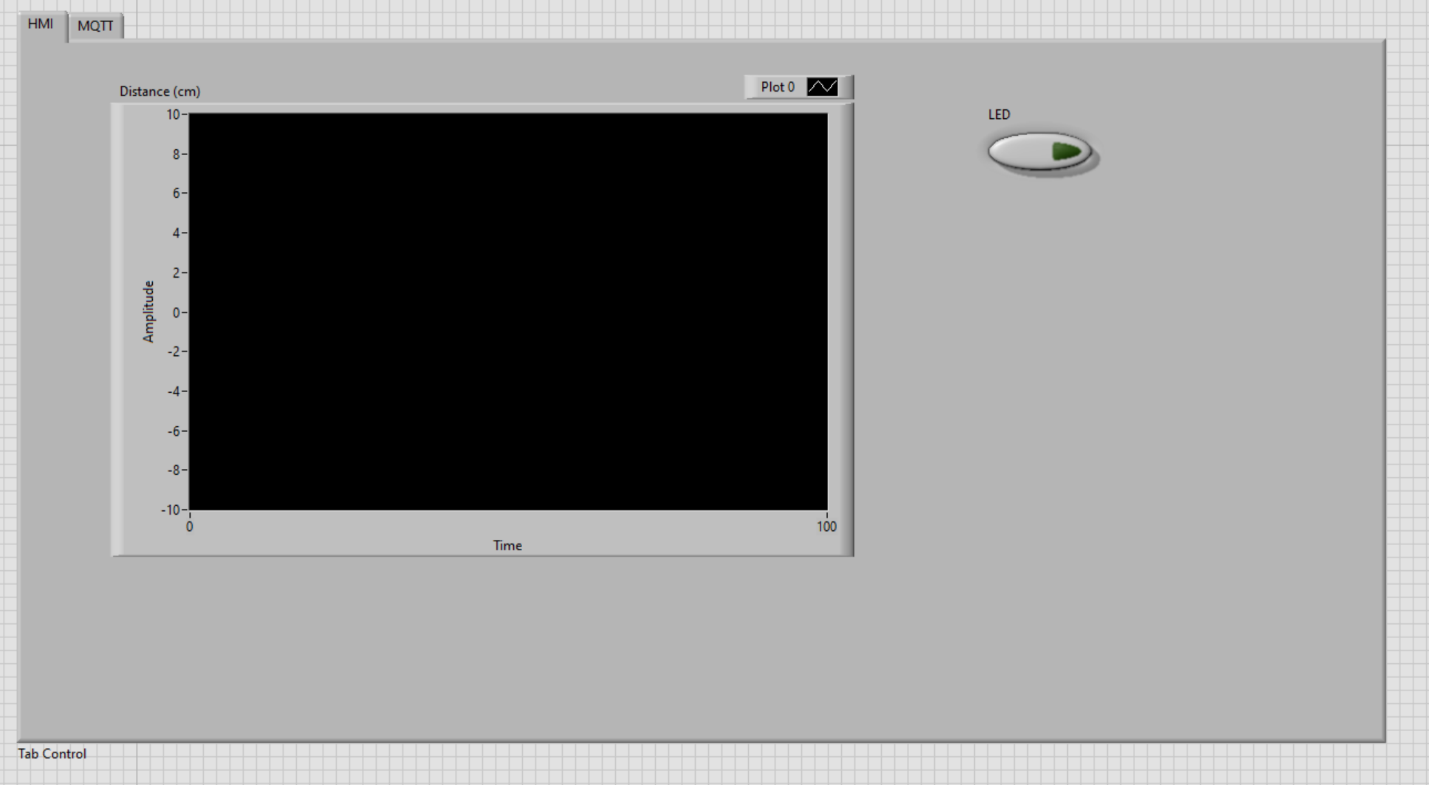
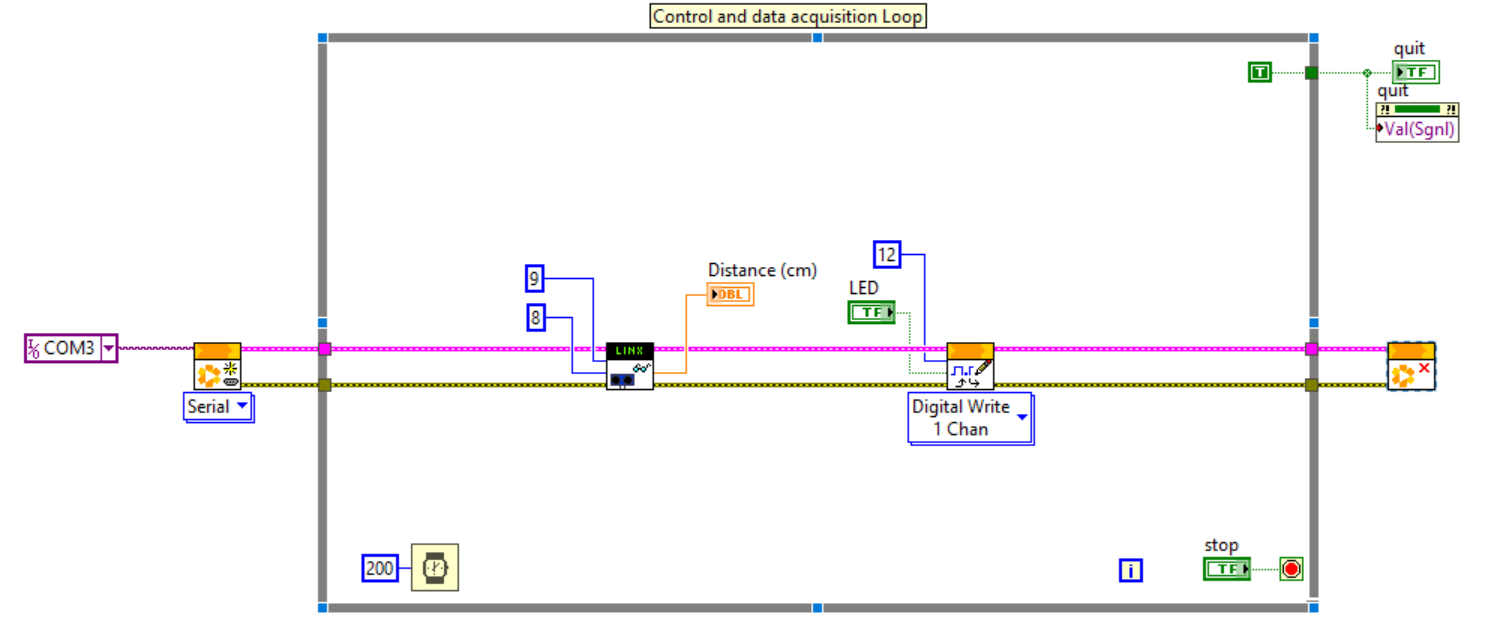
On the HMI tab, add a Waveform Chart labelled Distance (cm) and a Push Button labelled LED. In the block diagram, use LINX Open, LINX Close, Digital Write, and the provided Ultrasonic Read Fixed.vi from the Lab7 folder. Keep sensing and actuation local; the cloud is not the inner loop of the controller.

LabVIEW front panel with a Distance chart and LED push button.
Add a Distance (cm) waveform chart and an LED push button.
LabVIEW block diagram with LINX, ultrasonic-read, and digital-write logic.
Wire Centimetres to Distance (cm) and Digital Write Output Value to the LED.

Measure

Publish ThingsBoard JSON telemetry

Build one valid JSON object containing the measured distance and actual LED state, then publish it to v1/devices/me/telemetry. Use LabVIEW string formatting, arithmetic, comparison, and Boolean logic

{
  "distance_cm": 42.7,
  "led_state": true
}

Your final string should resemble the example above.

Timing: keep the local Arduino/LabVIEW loop at approximately 100–250 ms
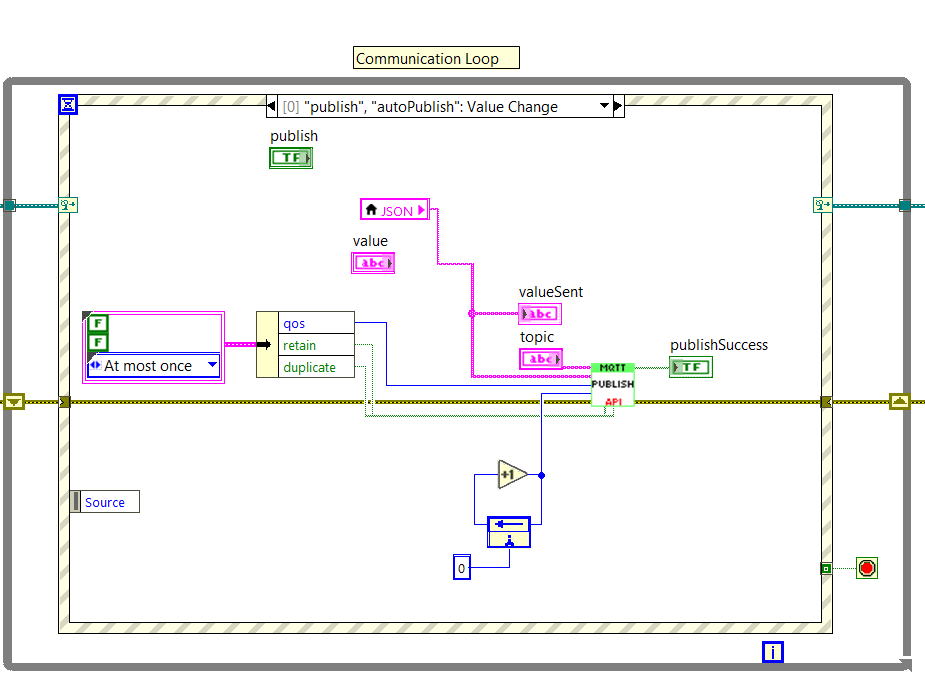
LabVIEW Communication Loop publish event showing a JSON indicator, a JSON local variable read, value and valueSent wires, and the MQTT Publish API.
Wire the output JSON string to a string indicator named JSON. In the publish communication loop, create a local variable for JSON, right-click it, select Change to Read, and use its read value as the publish payload. Remove the old wire connection between value and the wire branch so the JSON local-variable read is the only payload source.

Measure

Receive led_switch and synchronize at startup

Use led_switch as the desired dashboard state. Subscribe to live shared-attribute changes, request the current value after every connection, and decode each received JSON string with LabVIEW's Unflatten From JSON function before applying the Boolean through local logic.

Live update

Subscribe to v1/devices/me/attributes.

{"led_switch":true}

The value may also be Boolean false.

The response may resemble:

{"led_switch":true}
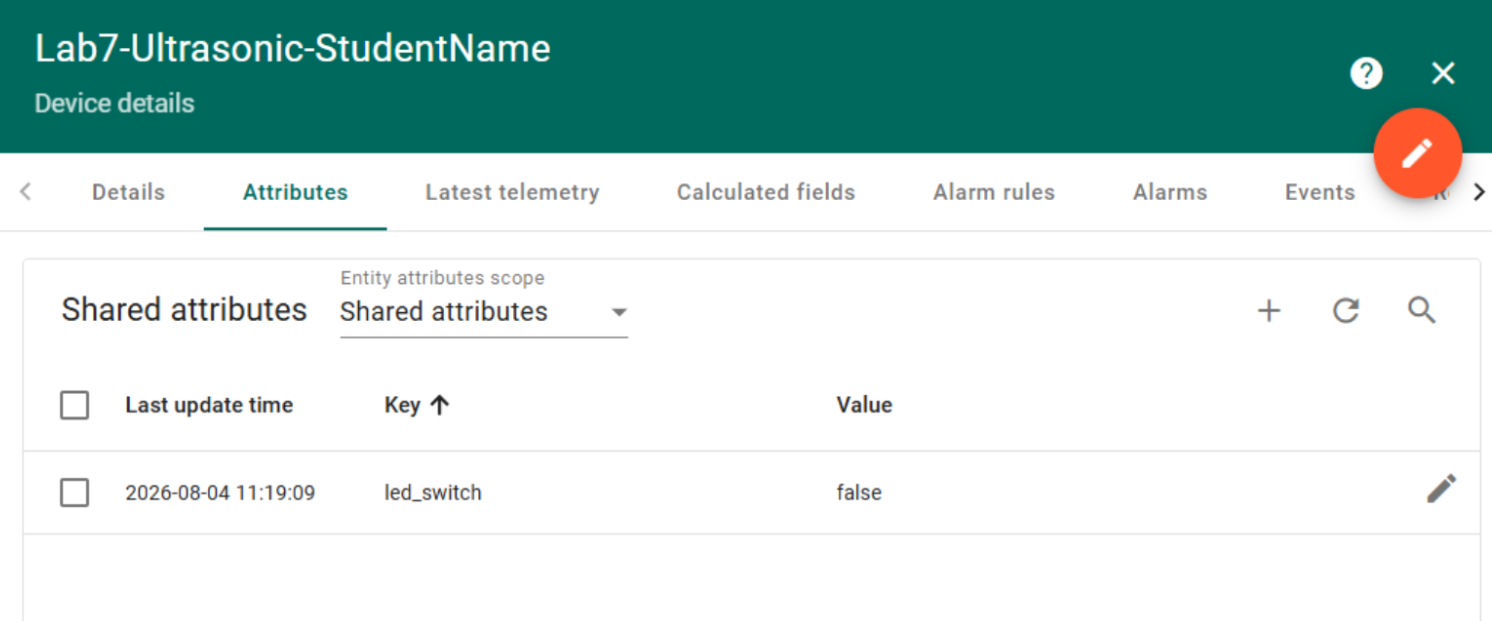
ThingsBoard Shared attributes tab showing the Boolean led_switch attribute.
Confirm that led_switch is a Boolean shared attribute and that no credential is visible.

LabVIEW receive path

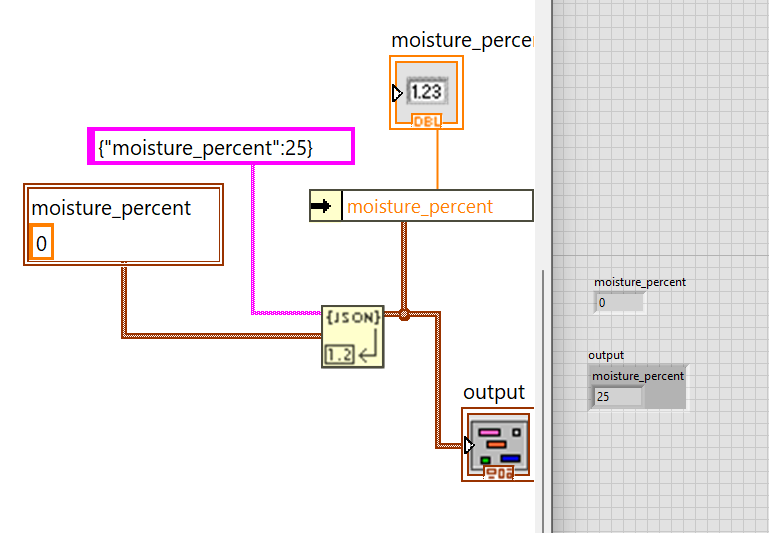
Subscribe to the live-attribute topic, pass the received JSON string into Unflatten From JSON, and wire a typed cluster constant that contains the expected led_switch Boolean field. The function returns the populated brown cluster wire; connect that wire to an Unbundle by Name block, select led_switch, and use the resulting typed Boolean in the local Digital Write logic. For a numeric field such as moisture_threshold, select that numeric field instead and wire its numeric output into the comparison or indicator that uses it. Request the current shared value immediately after every connection or reconnection.

LabVIEW Unflatten From JSON function converting a JSON string containing moisture_percent into a typed output cluster and numeric indicator.
Use Unflatten From JSON to decode the cloud message. Wire the incoming JSON string to the function, create a typed cluster constant or control with the expected field name and data type (for example, led_switch as Boolean), then connect the function's brown cluster output wire to an Unbundle by Name block. Select the field you need, such as led_switch or a numeric moisture_threshold, and wire that typed output into the indicator, comparison, or Digital Write logic that manipulates the value. The field names in the type definition must match the JSON keys exactly; simply displaying the cluster does not extract or apply the variable.

Explain

Create the ThingsBoard dashboard

  1. Open Dashboards, create a dashboard, and name it Lab 7 Ultrasonic Dashboard.
  2. Open edit mode and select the Lab7-Ultrasonic-StudentName device as the datasource when configuring each widget.
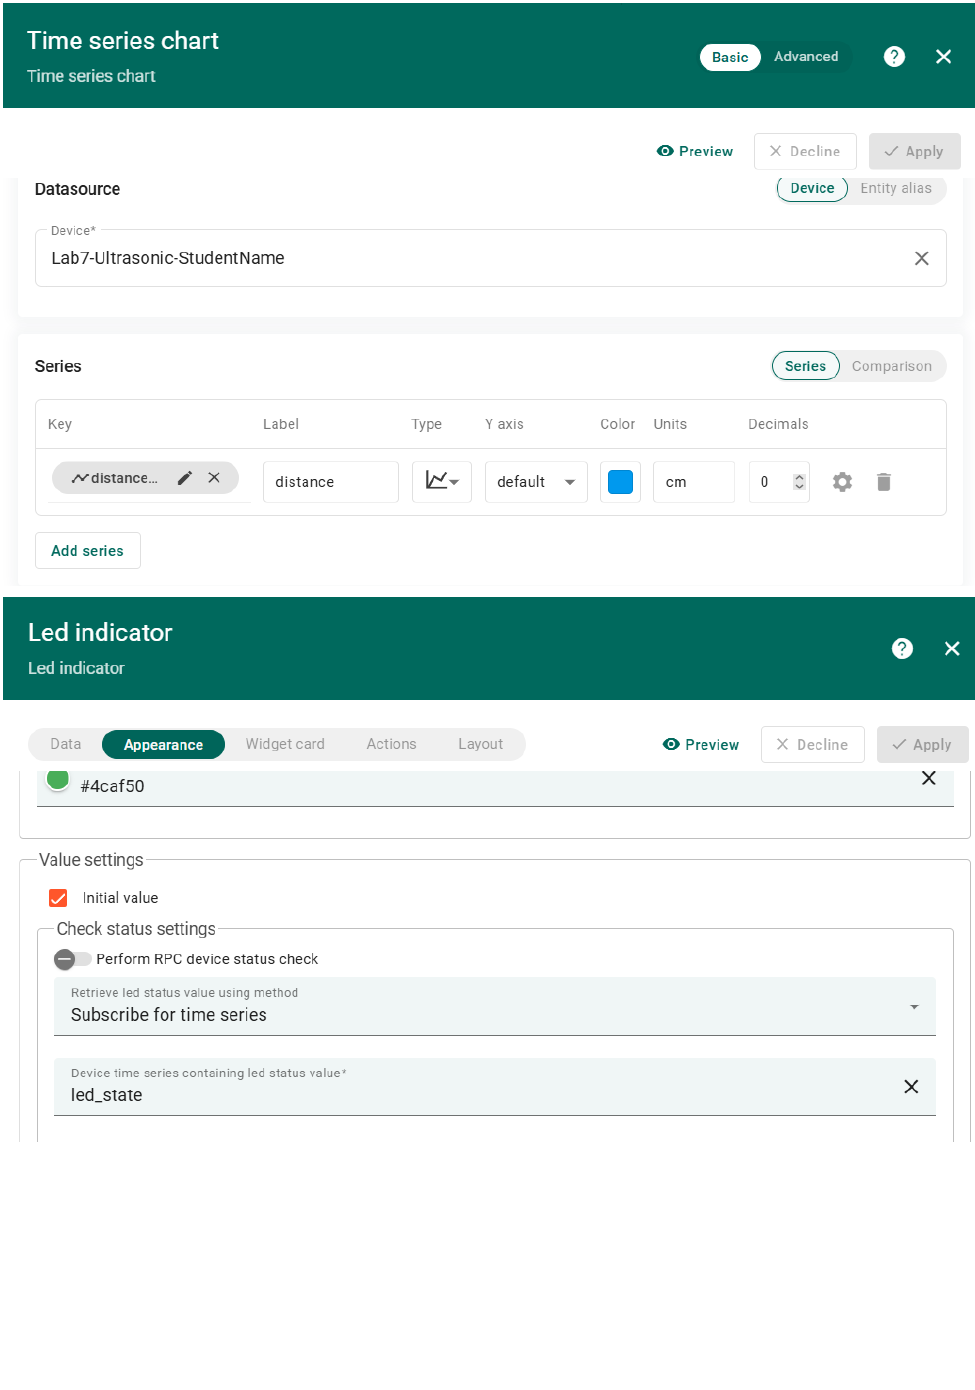
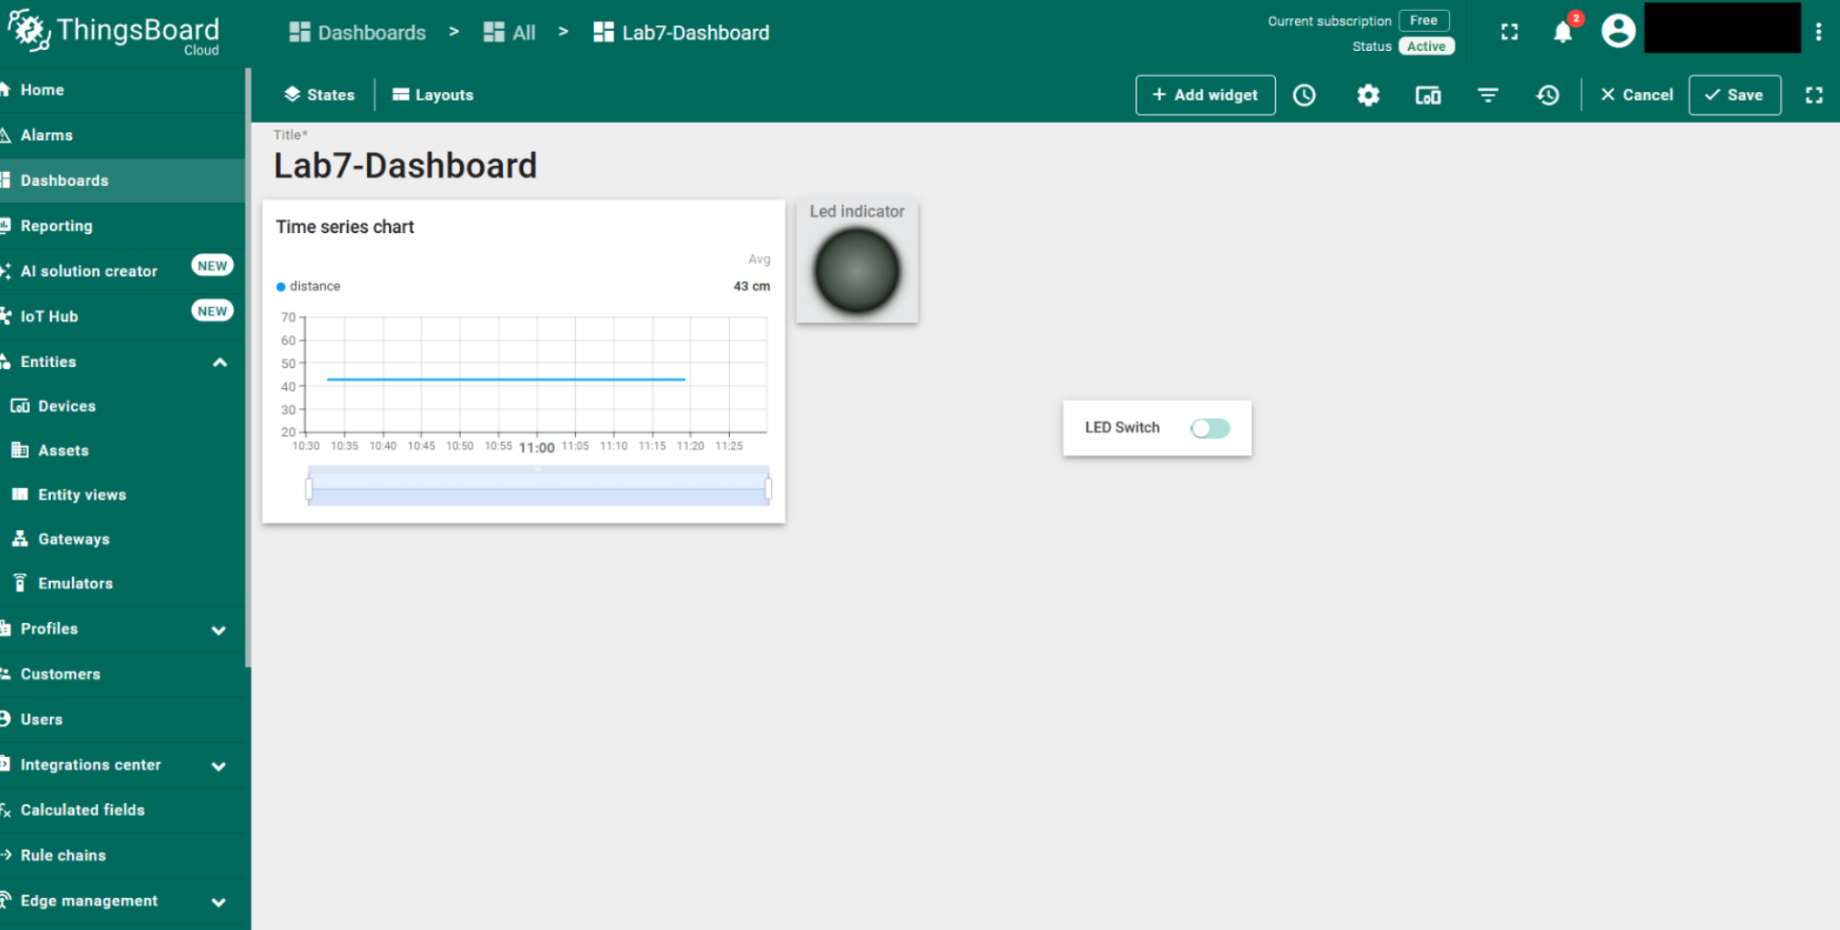
  3. Add exactly three widgets: a time-series chart, an LED indicator, and a single switch. Follow the configuration screenshots below for each widget.
  4. For the time-series chart, add the distance_cm telemetry series and label its units in centimetres.
  5. For the LED indicator, use led_state telemetry, disable the RPC device-status check, and subscribe for time-series updates.
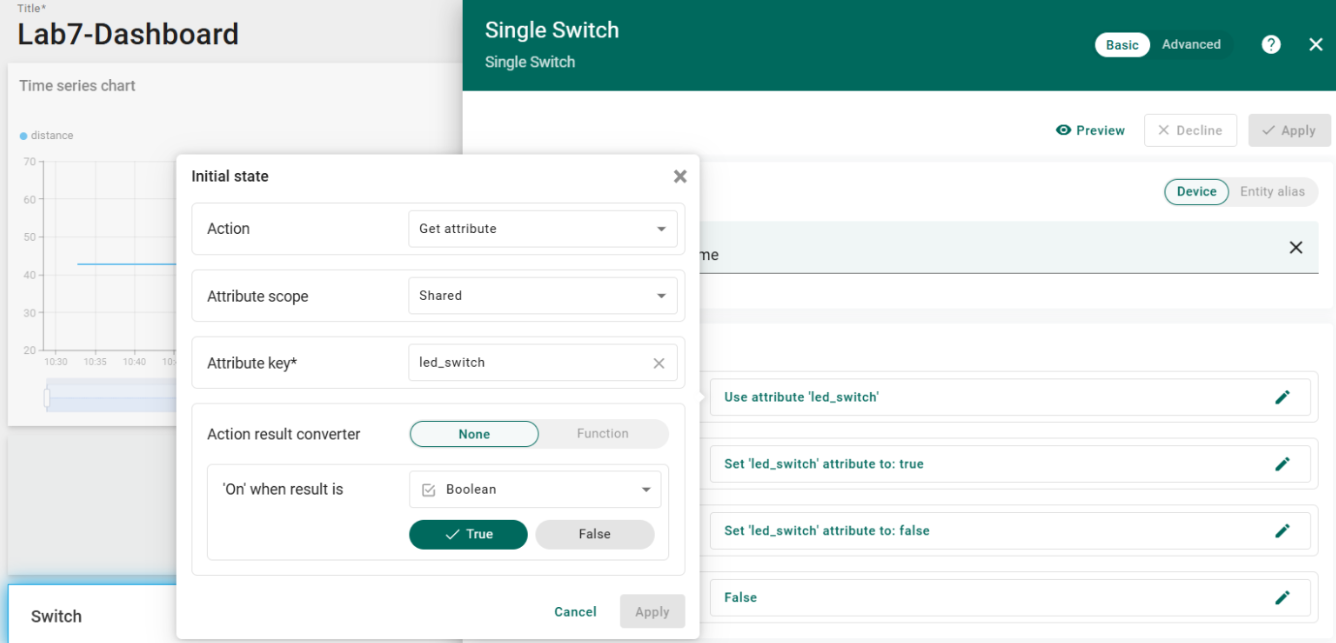
  6. For the single switch, use the shared attribute led_switch; get its initial value from the shared attribute and set Boolean true or false when toggled.
  7. Do not configure the switch to write telemetry, set a server-side attribute, add a time series, or execute RPC. Save the dashboard and exit edit mode.
Widget configuration sequence: create the dashboard first, then configure the time-series chart, LED indicator, and single switch in that order. Keep the device and data keys consistent across all three widgets.
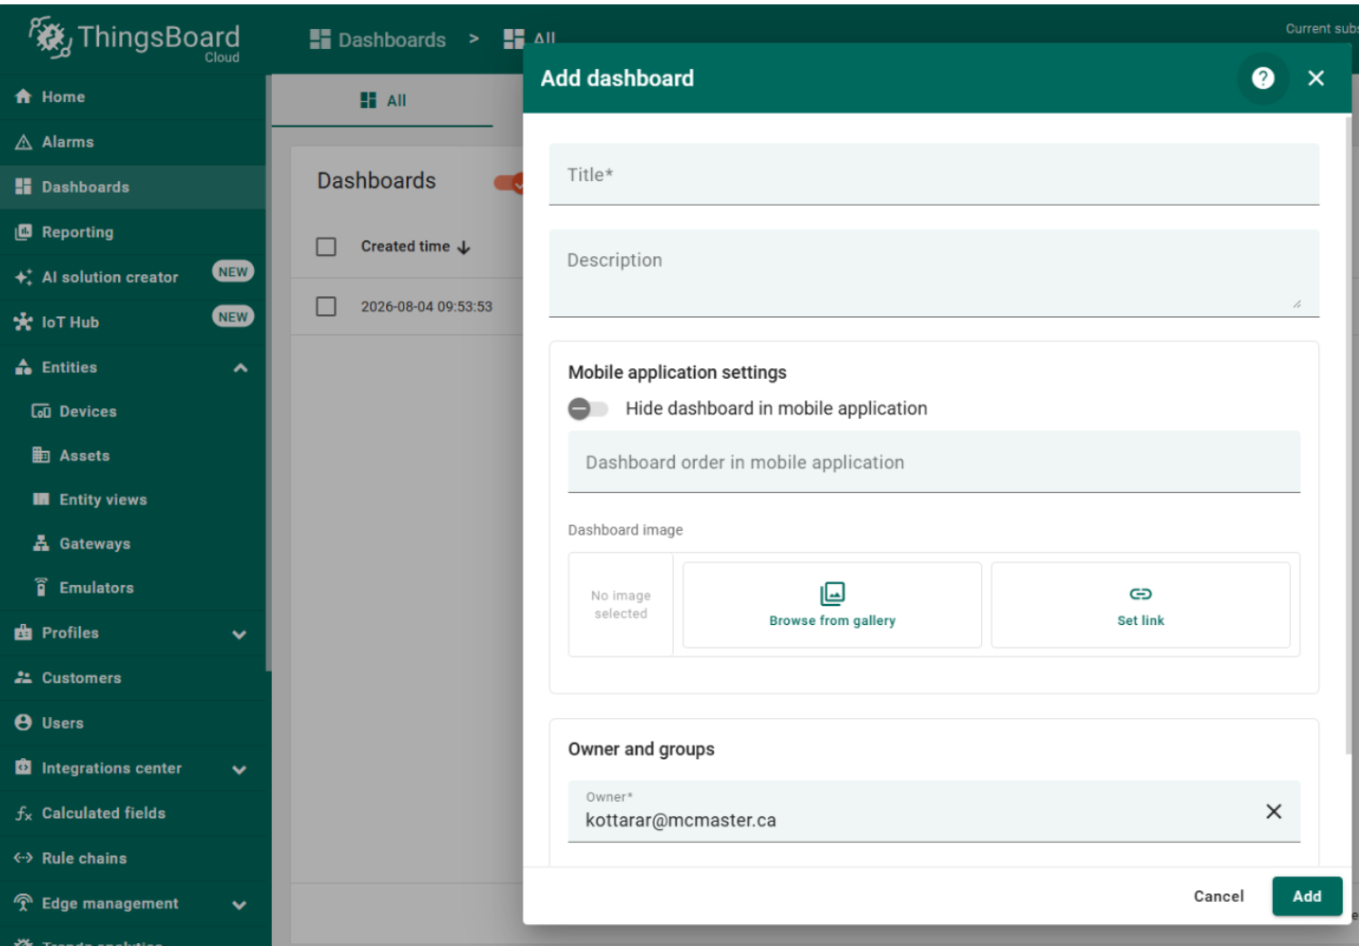
ThingsBoard Add dashboard dialog opened from the Dashboards page.
Create and name Lab 7 Ultrasonic Dashboard.
ThingsBoard Time series chart configuration for a distance series and LED indicator configuration using led_state telemetry.
Configure the time-series chart for distance_cm and the LED indicator for led_state; the two widget dialogs are shown together.
ThingsBoard Single Switch configuration showing the led_switch shared attribute for initial state and true or false actions.
Configure get/set access to the Boolean shared attribute led_switch.
Completed Lab 7 ThingsBoard dashboard with a distance time-series chart, LED indicator, and LED switch.
Verify the completed dashboard displays the distance chart, actual-state indicator, and LED switch together.
Verify cloud configuration first: toggle the dashboard switch and confirm that led_switch changes under the device's Shared Attributes tab. Complete this check before troubleshooting LabVIEW.
If the dashboard has no value or the switch has no effect
  • Confirm the entity alias points to the Lab 7 device and each widget uses the exact distance_cm, led_state, or led_switch key.
  • Confirm the switch sets a shared attribute, not telemetry, RPC, or a server attribute.
  • Verify led_switch changes in the Shared Attributes tab before inspecting the LabVIEW subscription and JSON path.

Reflect

Learning Outcomes Achieved

  • Configure a ThingsBoard device and protect its password-equivalent access token.
  • Publish labelled distance and actual LED-state telemetry through MQTT and verify it in the cloud.
  • Receive, validate, and synchronize a persistent shared-attribute command after startup and reconnection.
  • Integrate HC-SR04 sensing and D12 LED actuation through LabVIEW LINX while keeping local logic safe during cloud loss.
  • Build and test a dashboard that distinguishes desired led_switch from reported led_state.

Deliverables

Submit or demonstrate

  1. ThingsBoard account and Lab 7 device created.
  2. Device token entered privately into LabVIEW and excluded from submitted evidence.
  3. Test distance_cm/led_state telemetry visible under Latest Telemetry.
  4. LabVIEW MQTT configuration with the token redacted.
  5. Sensor/LED circuit and local LabVIEW HMI evidence.
  6. JSON telemetry updating about once per second.
  7. Manual shared led_switch update and startup request response.
  8. Dashboard switch changes led_switch; LabVIEW receives it; Arduino LED responds.
  9. Actual led_state returns to ThingsBoard separately from desired state.
  10. Final dashboard screenshot or instructor demonstration.
  11. Reconnect, malformed-message, safe-shutdown, and internet-loss behaviour.
  12. System explanation, local extension, reflection, and suggestions.
Safe cleanup: stop with the VI Stop control, turn the LED off, close MQTT, LINX/VISA, queue, event, and other references, then disconnect Arduino USB before changing or storing the circuit. Remove real tokens from saved front-panel defaults and local examples before distributing the VI.

Submission questions

Glossary

ThingsBoard Cloud account
An individual tenant account used to manage devices, telemetry, shared attributes, and dashboards.
Device
A ThingsBoard entity representing one physical project; this lab uses Lab7-Ultrasonic-StudentName.
Telemetry
Measurement or reported-state data sent by LabVIEW, including distance_cm and actual led_state.
Shared attribute
A persistent cloud-configured value sent to the device, including desired led_switch.
MQTT
Lightweight publish/subscribe messaging protocol used for IoT data exchange.
Broker
Server that routes MQTT messages between publishers and subscribers.
Client
Program connected to the MQTT broker, such as the LabVIEW VI.
Device access token
Private credential used as the MQTT user name to authenticate one ThingsBoard device.
Publish
Send a JSON payload to an MQTT topic, such as telemetry or an attribute request.
Subscribe
Listen to an MQTT topic, such as live or requested shared-attribute messages.
Topic
MQTT address string that identifies where a message is sent or received.
Dashboard
Web HMI that displays sensor data and offers controls.
Widget
Dashboard element such as a gauge or switch.
Gauge
Widget that displays numeric distance values.
Switch
Widget configured to get and set the Boolean shared attribute led_switch.
HC-SR04
Ultrasonic distance sensor with VCC, Trig, Echo, and GND pins.
Trig
Sensor input pin used to start the ultrasonic pulse.
Echo
Sensor output pin whose pulse width represents return time.
LINX
LabVIEW toolkit used to communicate with Arduino hardware.
Local variable
LabVIEW object used here to read Distance or RX Value inside another structure.
RX Value
Received MQTT JSON string that is decoded with Unflatten From JSON and type-checked before applying led_switch.
Unflatten From JSON
LabVIEW function that converts a JSON string into a typed cluster or data structure. The expected field names and data types must match the JSON keys and values.
Cloud monitoring
Viewing local sensor data through ThingsBoard telemetry and dashboard widgets.
Remote control
Using a cloud command to affect local hardware behavior.