
Phase 1

Understand Requirements

Start with the central design question: How can you combine sensors, actuators, local logic, local HMI, cloud communication, and web-based HMI into a purposeful smart system?

ProblemReal-world need
PrototypeSmall-scale model
SensorsCollect information
LogicArduino or LabVIEW
ActuatorPhysical response
Local HMIDisplay and control
CloudStore or transfer
Web HMIRemote view/control
DemoCommunicate clearly

Learning Outcomes

  • Define a real-world smart-system purpose.
  • Select suitable sensors and actuators.
  • Build a low-cost small-scale prototype.
  • Use local logic to make decisions from sensor evidence.
  • Create a local HMI for monitoring or control.
  • Create a web-based HMI or cloud dashboard.
  • Transfer data to a cloud platform or remote interface.
  • Explain how hardware, software, and cloud pieces interact.
  • Plan a project schedule and track progress.
  • Troubleshoot hardware, code, and interface problems systematically.
  • Prepare a concise proposal, demo, video, and code submission.
  • Use evidence to defend design decisions.
  • Recognize when instructor approval is required.
Metadata Snapshot

Proposal length

2-3 pages.

Video length

3-4 minutes.

Hardware

At least 2 sensors and 1 actuator.

Complexity

Equivalent to about 3 combined labs.

HMI

Local HMI required; web HMI required.

Software

LabVIEW recommended; alternatives need comparable HMI quality.

Phase 2

Choose Project Idea

Your first submission is only one paragraph. It should name the application, the problem, at least two sensors, at least one actuator, the local HMI, and the cloud or web-based HMI.

One-Paragraph Template

Our project will design a smart [system/application] that solves [real-world problem]. It will use [sensor 1] and [sensor 2] to measure [quantities], and it will control [actuator] to [action]. A local HMI will allow the user to [monitor/control], while a web-based HMI will [display/control/alert/log] through [cloud platform]. The prototype will be built as a small-scale model using [materials].

Idea Workspace

Example Directions

PDF examples
  • Elevator system using limit switches and a motor.
  • Home security system using motion sensors.
  • Temperature monitoring/control system for a building.
  • Sun tracking system for a solar panel.
Expanded idea cards
  • Smart greenhouse monitor: moisture and temperature sensors, pump or fan actuator, LabVIEW HMI, cloud dashboard. Risk: water near electronics.
  • Smart package/security box: distance and door sensors, lock or alarm actuator, web alert. Risk: mechanical reliability.
  • Mini smart elevator: limit switches, position feedback, motor actuator, HMI floor request. Risk: motor control scope.
  • Smart storage monitor: light and humidity/temperature sensing, LED/buzzer actuator, data logging. Risk: meaningful purpose.
  • Solar tracker: light sensors, servo or stepper motion, cloud status. Risk: alignment and mechanism friction.

All ideas require instructor approval.

Phase 3

Consult Instructor

During the Nov 3 lab, the instructor spends about 5-10 minutes discussing each project idea. The idea may be accepted, modified, rejected, or replaced with a suggested direction.

Approval Check

Is the purpose clear and course-relevant?

Scope Check

Is it comparable to about three combined labs?

Risk Check

Are parts, wiring, cloud, and mechanisms realistic?

Instructor Feedback Notes

Phase 4

Submit Proposal

The proposal is due 09-Nov-25 prior to lab start and should be 2-3 pages. It is the team's plan for building, testing, demonstrating, and communicating the project.

Proposal Builder

Evidence Checklist

  • System block diagram or signal path.
  • Electrical schematic or wiring map.
  • Clear sensor and actuator choices.
  • Local HMI and web HMI descriptions.
  • Cloud feature description.
  • Risk or troubleshooting plan.
  • Weekly schedule with milestones.

Phase 5

Build Prototype

Build a low-cost, small-scale prototype. Cardboard, wood, and simple materials are acceptable when the prototype demonstrates a real smart-system purpose.

Hardware

At least two sensors and one actuator; no more than six sensors/actuators unless approved.

Purpose

The prototype should communicate a recognizable real-world application.

Instructor Role

The instructor reviews scope and monitors progress; troubleshooting remains the team's responsibility.

Hardware Planning Inputs

Phase 6

Develop Local HMI

A local HMI is required. LabVIEW is highly recommended, but another software environment may be accepted if the HMI quality is similar or better.

Phase 7

Add Cloud/Web HMI

The project must include a web-based HMI and a cloud feature such as data transfer, alerting, dashboard visualization, database storage, or remote control.

Phase 8

Test and Troubleshoot

Attendance is required during the three project weeks. Progress is monitored and assessed, but the team is responsible for systematic troubleshooting.

Requirement Checker

This checker is a planning aid only. Instructor approval is the final decision.

Complete the project checks to estimate readiness.

Risk Table

RiskStudent response
Too few components or weak purposeReconnect the build to a real use case and add meaningful sensing/actuation.
Too many devices or over-scopeReduce features or get instructor approval.
Cloud or web HMI delayedBuild a minimal dashboard first, then improve visuals.
Wiring or common-ground errorsTest one sensor or actuator path at a time.
Demo failurePrepare recorded evidence and a fallback explanation.

Phase 9

Prepare Demo

The real-life demo happens on 24-Nov-25. The last hour of lab is reserved for demos only.

Phase 10

Record Video

The video is due 24-Nov-25 with the code submission. It should be 3-4 minutes and describe hardware, describe software, and demonstrate the main functionality.

0:00-0:20

System name, problem, and purpose.

0:20-1:10

Hardware: sensors, actuator, wiring, prototype.

1:10-2:00

Software: local HMI, logic, cloud, web HMI.

2:00-3:30

Demonstrate functionality clearly.

3:30-4:00

Summarize evidence, limitations, and final result.

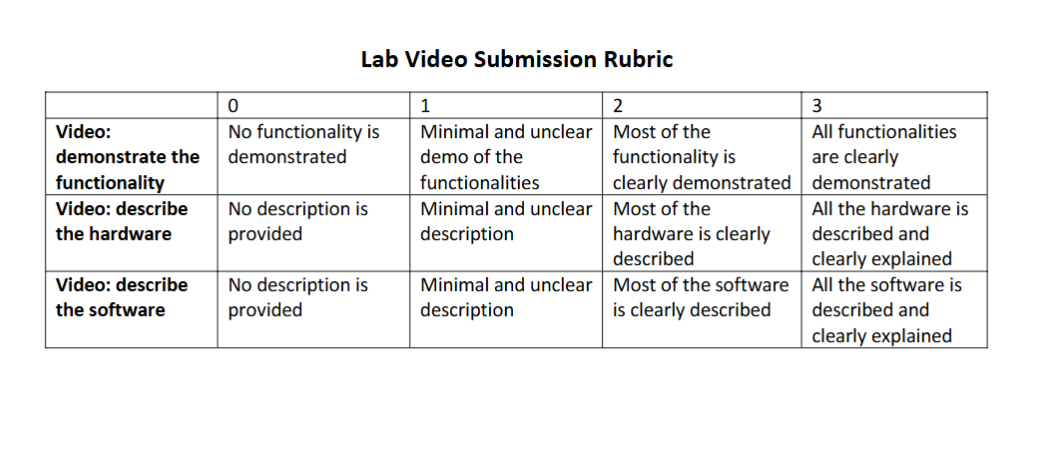
Lab Video Submission Rubric

The marking scheme lists Video as 2.5 marks; this rubric judges video quality and may be scaled to the official video mark.

Criterion0123
Video: demonstrate the functionalityNo functionality is demonstratedMinimal and unclear demo of the functionalitiesMost of the functionality is clearly demonstratedAll functionalities are clearly demonstrated
Video: describe the hardwareNo description is providedMinimal and unclear descriptionMost of the hardware is clearly describedAll the hardware is described and clearly explained
Video: describe the softwareNo description is providedMinimal and unclear descriptionMost of the software is clearly describedAll the software is described and clearly explained
Rubric for lab video submission with criteria for demonstrating functionality, describing hardware, and describing software, scored from 0 to 3.
Original rubric image from the project handout.

Phase 11

Submit Code and Evidence

Submit the video and code by 24-Nov-25. Keep evidence organized so the instructor can understand what was built, how it works, and what was verified.

Marking Scheme

ItemMarks
Project idea0.5
Proposal and schedule1
Project functionality3
Demo presentation2.5
Video2.5
Complexity4
Lab attendance and progress1.5
Table total12.5

Confirm the official weighting because the handout states "Project Weight: 15 Marks" but the table totals 12.5.

Submission Checklist

Phase 12

Reflect

Use the self-assessment to see what is complete, what still needs work, and what should be confirmed with the instructor.

Self-Assessment Tool

ItemStatus
Clear real-world purpose
At least 2 sensors
At least 1 actuator
Local HMI
Web-based HMI
Cloud feature
Logic complexity
Small-scale prototype
Proposal completeness
Demo readiness
Video readiness

Timeline and Glossary

02-Nov-25
Project idea, one paragraph, due end of day.
Nov 3 lab
Instructor discussion, 5-10 minutes per idea.
09-Nov-25
Proposal due prior to lab start.
Nov 9-24
Execution, weekly attendance, progress monitoring, and troubleshooting.
24-Nov-25
Demo, video, and code submission.
Glossary
  • Smart system: sensing, decision-making, actuation, and interface working toward a purpose.
  • Local HMI: nearby interface such as LabVIEW front panel.
  • Web HMI: remote browser/dashboard interface.
  • Cloud feature: online data transfer, storage, alerting, dashboarding, or remote control.
  • Complexity: design effort, integration, and functionality comparable to about three combined labs.

Weekly Planning Table

WeekGoalHardware progressSoftware progressCloud/HMI progressRisksInstructor feedback
Week 1
Week 2
Week 3